Are you
level 80 in Final Fantasy XIV? What weapon are you currently using? Here is a
video made by The
Fashionista FFXIV that shows you the Hates weapons in all
classes. You can find out what it looks like for your class/classes or the ones
you are interested in.
All these
Hades weapons have smock and magic circle effects on them. Inside the weapons, a
purple flame keeps burning, and black smoke comes out of them. All that effects
made them look so magically mysterious.
There are a
few weapons with a face on them. If you look closely, you can find them on:
Do you know
all these weapons are tradable? You can buy them on the Market Board.
If you are
new to the game, then this is one more goal for you to level up to 80, so you
can equip these fancy weapons and maybe take some cool screenshots with them.
Weapons like
these do not come in cheap. If you are low on Gil, MmoGah is here to help. You can buy FFXIV Gilthere. It is less than 2
dollars for 1M Gil currently, which will be much easier than you to farm it
yourself and save you more time to enjoy the game and have more fun.
There are
several ways to receive FFXIV Gil in the game. Therefore you
may find one that you feel comfortable with:
1.Trade it face-to-face. (You can put an item in the trading bar when you
are receiving your Gil.)
2.Through Market Board. (You put an item/several items on the Market
Board for sellers to buy.)
3.Through FC chest. (You invite the seller to your FC, then they put the
amount of Gil you ordered into the FC chest.)
Furthermore,
if you have any questions, feel free to contact them on Live Chat.
Most people
consider jungle to be a more decision-based role. Although this is true, we
realized most people don't use several key mechanics while jungling, which
would cause them to lose more. So today we'll cover the top 5 mechanics EVERY
JUNGLER should know in League of Legends.
The content is from Skill Capped. Thank you for
the amazing video.
In addition, if
you need a LoL Account, MmoGah has many cheap LoL Accounts for sale. Come to
choose the one you need!
Kite Your Camps
I'm sure many of
you have seen high ELO junglers kiting while killing camps. The reason for
doing so is that we can get closer to our next camp or location that we're
heading to. This shaves off valuable seconds off of each camp, which adds up a
lot over the course of a game.
Now, as far as the
technique, there's a specific one when doing your buffs. You want to land three
auto-attacks and walk back and then repeat this pattern. The idea is that we're
landing three auto-attacks for every 2 of the buffs - this is the most optimal.
We don't want to land one auto-attack and then walk back, for this will end up
trading 1 for 1 in auto-attacks with the buff, resulting in tanking far more damage
while clearing significantly slower.
It's important to
note that you want to weave in spells in between your auto-attacks cooldown. Often,
players will cancel their auto-attacks with an ability, resulting in them doing
less DPS. Make sure to avoid this.
Ways to Kill Each Camp
Krug (1:56-2:30 of the
video)
Let's start with
the Krugs since that's a camp a lot of players struggle to do without taking
too much damage.
You start by
pulling the Ancient and Medium Krug further out. Then you position yourself, so
you're on one side of the Ancient Krug while the Medium Krug is on the
other. Then in between each auto-attack, we move away from the Medium Krug. The
pattern ends up making you walk back and forth. In this example, I
auto-attack, then move right, auto-attack, then move left and repeat this pattern.
This causes the Medium Krug to get stuck running back and forth and results in
you taking no damage from it.
Raptor (2:55-3:42 of the
video)
Make sure to focus
on the small ones before switching to the large ones. Believe it or not, the
small ones will actually do more damage to you over time if you leave them up. Additionally,
make sure to kite and not just stand in the middle of them. This is important
as the small Raptors have much higher attack speed than you. Now, if you're
playing a Jungler that runs Hunter's Talisman, then you don't want to focus
each small raptor down one at a time. Instead, try to spread out your
auto-attacks while the healing effect from Hunter's Talisman steals their
health. Then, get them down to low enough HP to kill them all at once. By doing
this, I was able to kill the Raptor camp as Kha'Zix without losing any health
and using any potion.
Wolves
For the Wolves,
you can follow the same rule of focusing on the small ones first while kiting
them to your next location.
Gromp(3:50-4:53 of the
video)
The Gromp also has
an advanced trick. It gets bonus attack speed for its first five attacks. This
means that if we stand still and auto-attack with the Gromp, he's going to land
more autos than we will and do more DPS. However, if we kite back after each
auto-attack, we can force the Gromp to trade 1 for 1. Once you get good at
this, you can then start weaving in your spells after each auto-attack while
kiting. This helps reduce the amount of damage you take from Gromp.
Another trick with
Gromp is to smite it right before you're finishing Blue. You can do this by
kiting the Blue to this location and then smiting Gromp. This saves you
time as you don't have to run to the Gromp and then back towards the river. Additionally,
if you have an AoE ability, you can time it to hit them both at the same time. This
trick works really well on champions with constant AoE damage such as Amumu and
Hecarim since they can actually do both Gromp and Blue simultaneously.
How to Improve Our Map Awareness
Let's divide our
time as a jungler into two sections. The first is when we're fighting a camp. The
second is when we're moving to our next camp.
When We're Fighting a Camp:
At this time, you
should be balancing your attention between what's in front of you and the
minimap. When you have to cast spells and kite, focus on what's in front of
you. When your spells are on cooldown and you're simply auto-attacking, then focus
on the minimap.
There's also another
thing a jungler should be checking consistently - their teammates' health bars.
When teammates are low on health, this can signal that they traded with the
enemy. This is a strong indicator that we should move our camera to see if the
enemy is also low on health and if the lane is gankable. Essentially, while
fighting camps, think of yourself as doing reconnaissance.
When We're Moving to Our Next Camp
This is the ideal
time to physically move the camera and check the lanes.
There are two main
ways to check the lanes: The first is to do
it manually by moving your cursor and left-clicking. The second is to
use the F1-F4 hotkeys, which would let you jump the camera to your teammates'
position.
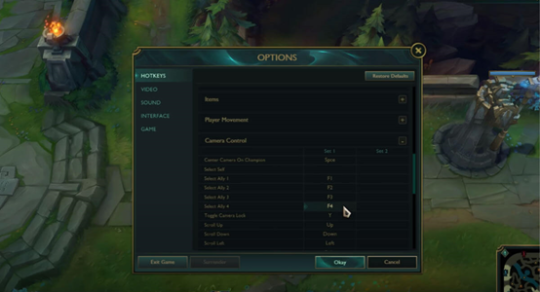
If you want to use
these, we highly recommend going into the settings - under hotkeys, then camera
control, and rebinding them, so the F keys align with the corresponding Ally.
So what we can do
with these binds is first to send a movement command to our next camp, then hit
F1, then F2, then F3, and finally spacebar and jump back to ourselves. We do
this whenever we move to our next camp. This lets us check which way the
minions are pushing in each lane and the health of the enemy.
To summarize,
while fighting a camp, your focus should be on your minimap and teammates’ health
bars at least 50% of the time. Then, once you've killed the camp and are moving
to the next one, send a movement command, check each of your lanes with your
camera, then hit the spacebar and jump back to yourself.
Decrease the Likelihood of Walking Over a Ward
When moving
through the map, you should always be doing two things:
The first is
moving through nearby brushes to check for wards.
The second is
using the attack move command instead of a regular movement command. By attack
moving, we'll stop and immediately attack a ward if it's in front of us.
For example, let's
say you move to invade. You send an attack move command along the path you want
to take. Afterward, you hit F1, F2, and F3 to check the state of your lanes. Once
you hit the spacebar and jump back to yourself, you'll find you're
automatically killing a ward. This is how you should be moving through the
jungle. The attack move command can be used by hitting “A+Left Click” or “Shift+Right
Click”.
Residual Vision
There's a mechanic
you should be aware of in regards to wards: Residual Vision. After you kill a
ward that's been disabled, it will retain a vision of you for around 4 seconds
after it dies. For this reason, you should never immediately path in the
direction you intend to go after you kill a ward. Instead, walk in the opposite
direction for 4 seconds, and then take the original path you intended, which
will trick the enemy.
Take Rift Herald Optimally.
Rift Herald is
currently one of the strongest objectives for snowballing your leads. Most
players take much longer to kill it than they should and often spend time
circling it and trying to hit its eye. So let's break it down.
You should always
start Herald by auto-attacking it once and then moving behind it. Right before
it dashes, auto-attack to hit the eye. This will get the next eye up faster, thus
reducing the overall time it takes to kill it. We then stand still and damage
it until the next eye opens. One thing to notice here is that we need to move
at the start of its attack animation, not at the end.
The next tip has
to do with Rift Herald's big swipe attack. This occurs twice -once at 66% of
its HP and second at 33% of its HP. It most commonly occurs after you hit the
eye. Most people try to dodge this by moving backward - this is a mistake as
the hitbox is pretty obnoxious and you usually end up still taking damage. Instead
of walking back, simply walk through the Herald. This will dodge
its swipe much more consistently while taking less time.
The final step is
to wait for an eye to open before putting Herald below 2400 health. This is
important because if it is put below 2400 health without its eye open, it won't
re-open again by doing this. You can wait until it’s at 1400 health to
instantly kill it by attacking the eye.
Additionally, the
Eye of the Herald that drops will take 40 seconds to despawn if it isn't picked
up - a lot longer than people realize.
How many of these mechanics did you know? But overall, hope the content
will help you with the jungling journey. If you like the content, don’t forget
to subscribe to his channel and stay tuned to MmoGah for more LoL News.
How to Plant Fruit Trees on Other People's Island?
You need to add him/her as your best friend before you can plant it. Only after you become best friend with the other party, your fruit tree can be thrown and planted on the other party's island.
Notice
1. Fruit trees (including apples, peaches, cherries, pears, coconuts, oranges, and bamboo)
2. In addition, if there is no best friend app, you need to open the friend island once to unlock the best friend function. Below we will introduce how to become best friend in detail.
Best friends
What Is Best friends on Animal Crossing
To become best friends, you'll need to go through the process of becoming friends on your Switch systems as well as within the game. Here's an explanation of how to become best friends in Animal Crossing. You should only become best friends with people you trust. Otherwise, they could steal valuable resources from your island and leave you in a bind.
How to Become Best friends on Animal Crossing
Note: If you're sharing an island with others, you'll each have your own best friend list separate from the other players on your island. Additionally, even though you're sharing an island, each player will need to be covered in a Nintendo Switch Online subscription to take part in any online functions.
Please go-ahead to the Airport and talk to Orville, who is behind the counter. You can choose to invite someone using local or online play. If you tell Orville that you want to play with others online, you'll unlock the Best Friends app on your NookPhone. Then you can use it to communicate with other players and invite them to your island.
You should invite someone to your island or visit someone else's island to become friends with them. When playing with another player, you can either make it so that any random local or online player can show up on your island. Or, if you just want to make sure that only a trusted friend shows up, you'll need to talk to Orville about setting up a temporary code.
If you chose the second option, Orville would give you a code to use. Please make sure your friend knows the code so they can use it on their Switch.
A small animation will play, which show you that a visitor is coming to your island. If you've played together, you'll show up on each other's friend lists.
Once the system recognizes that you are friends, one of you will need to open your NookPhone and select the Best Friends app.
From your friend list, select the player that you want to become best friends with.
Plese select "Ask to Be Best Friends."
Now your friend needs to accept the friend request from their Switch.
Now, you're the best of friends
You've become best friends, and you can successfully trade fruit trees!
Lastly, you can run around each other's islands and harvest together. Please remember that the items you collect while exploring someone else's island will show up in the Recycle Box at Resident Services on your own island. Have fun playing together! I hope you find lots of rare creatures and make tons of animal crossing bells!
The above is the important information about fruit tree trading that our MmoGah website provides for you. Don't forget to add the best friend function. Otherwise, it will affect your fruit tree transaction. In addition, our website sells animal crossing items, nook miles ticket and animal crossing bells at reasonable prices, and we also have a good reputation. Please choose us, and you will not be disappointed!
Welcome to ourWoW TBC Classic Leveling Guide. This guide is intended to unlock heroic dungeons, grind mobs and reach level 70as fast as possible during the madness ofWoWClassic TBC'slaunch week. All the content of this article is quoted from a player -Biosparks TV's video.
There are a few reasons why players prefer to grind mobs:
1. Some players may not have access to a 5-man group when they need one, so this is a solid choice.
2. If players can't find 4 other players to team up with, they will prefer a solo leveling experience.
3. The 30 dungeon cap will be active after TBC launches, and players can grind mobs during the cooldowns.
You can follow these tips to grind more mobs:
1. Grinding as many mobs as possible and ignoring all quests
2. Visiting the towns regularly to repair and stock up on food & water
3. Hopping between layers regularly if other players arrive
4. Getting to level 64 as soon as possible
Leveling 61-63
There are a few good spots in outland, which are great to farm experiences, especially if you can get to them with no competitors.
The first spot is Terokkar Forest. You'd better not go to Hellfire Peninsula and Zangarmash since these two spots are going to be massively overpopulated during the launch week of TBC classic. You'd better grind the Blood Furnace to reach level 61, but if you're playing a class that is able to kill mobs or you have good gear, then you can still come here at level 60 as soon as you get through the Dark Portal.
Another two spots are Veil Reskk and Raastok Glade. Many Arakkoa throughout these two spots, so you can get bonuses from them. Tyrone can also be used as an option, but there aren't many mobs concentrated. There are also a few higher-level mobs in the town, but it can be risky. If you want to pull them, you should go to Shattrath City & Stonebreaker Hold for the horde or Lyrium for the alliance to repair and restock supplies.
Leveling 62-64
From level 62 to 64, you can branch out to Firewing Point. There are lots of mobs concentrated together, which will provide a steady stream of experiences and drops. Bear in mind that Blood Elves can also drop Firewing Signets, and they can be useful to keep, or you can sell them if you want to gain reputations.
Leveling 64-67
From level 64 to 67, you can get access to the perfect grinding spots in outland. The fortress is on the border of the grand, from which you can find an abundance of mobs. It will be quite difficult to clear everything before they start respawning, and you can jump to a different layer. Mobs patrol around the fortress. The watchtowers, buildings, and wolf kennels are the spots where you can start grinding and taking advantage of all available experiences. These mobs can drop Mark of Kil'jaeden that can be useful to outdoor players, and players can sell them off.
The alliance players are close to Telaar Town, so they can render, restock and repair supplies. The horde players will have to travel a bit further to the Garadar or visit the Pilot Martial at the Nesingwary Camp.
Leveling 67-69
Once you get to level 67, you can head over to another spot. This spot is Manaforge B'naar and absolutely full of mobs that can drop Sunfury Signets. They can be collected and turned into Scryers for reputations.
What makes this spot so amazing? The reason is that it has a high density of mobs, and Area 52 is next to it. The Area 52 has everything you need, such as vendors, repairs, and restocking. It even has an available bank, making the space in your bag much more manageable, and reduces the time of grinding mobs.
Leveling 69-70
Once you reach level 69, you can finish in another spot - Manaforge Duro. It is densely packed with mobs that also drop Sunfury Signets. The Cosmowrench town is also next to it, which has a flight path linked to Area 52, so it's a very effective place to grind quests. You can stay here indefinitely up to level 70 since you can get a lot of available experiences.
Here's a list of spots, and you can use it as a reference
1. Leveling 60-61 The Blood Furnace or skip to Terokkar Forest
3. Leveling 62-64 Firewing Point & Bonechewer Runs (Terokkar Forest)
4. Leveling 64-67 Kil'sorrow Fortress (Nagrand)
5. Leveling 67-69 Manaforge B'naar (Netherstorm)
Lastly, we hope that this guide is helpful for you. If you want to learn more classic TBC guides or news, please visit our site: MmoGah.com. Of course, you can buy WoW classic gold to strengthen your weapons now. When WoW classic TBC releases, you can also farm WoW TBC classic gold by yourself or buy WoW Classic TBC gold from MmoGah directly to enjoy your game.
Big Sale!Path of Exile 3.14 is in full swing, and
exiles respond well to the new patch Ultimatum. The Professional Gaming Site
MmoGah will have a big promotion – 5% OFF in order to give back to our
old and new customers.
Promotion Details:
- Duration: April
26 – May 3, 2021 (PDT)
- 5% Coupon
Code: poe5
- The coupon can be used directly
when you place orders without upper limit of using times.
We have a professional PoE team to farm PoE Goods through
handwork and legitimate ways so that you can buy with confidence. MmoGah is the best PoE Currency Site for you. Sincerely
welcome you to enjoy the large 5% OFF promotion of PoE Ultimatum at mmogah.com!
Before this league, I didn't share so-called "best
starter builds" with you, as I find it made a futile effort. There must be
lots of league starter builds made by exiles before new leagues start. However,
most of those are "predictive". You will find those builds you are
going to use may not be suitable for the new league. There may be fantastic
builds before new leagues, but it's like finding a needle in a haystack. So I
quit this work since this league. And I will show you helpful PoE Builds after new leagues start.
- Chaos Golem grants reduced physical damage you taken.
- We're
also using Carnage and Host Chieftains for this build. They grant frenzy and
power charges for you and your minions.
-
You just need to go to "The Old Fields" in act 2 and "The Ashen
Fields" in act 7. Cast Desecrate until you find the right corpses.
(Carnage Chieftain in act 2 and Host Chieftain in act 7)
- Then raise them as spectres.
- Please watch the following video from 8:18 to 8:50.
-
Winter Orb has a few roles. First of all, it deals cold damage to trigger
Elemental Equilibrium, increasing enemies' cold resistance by 25% but reducing
their fire and lighting resistances by 50%.
- Winter
Orb is also linked with Cast while Channelling, and this means that it will
keep casting Desecrate and Flash Offering while you channel it. In this way,
you always have corpses on the floor and the Flesh Offering buff.
Boots:
Zealotry – Skitterbots – Vaal Haste – Generosity
- Zealotry grants more than 15% Spell Damage to your
skeletons.
-
Skitterbots are going to keep chilling and shocking enemies for more
survivability and damage.
- Vaal Haste grants a temporary cast speed buff for your
minions. You can use it on bosses.
Ring:
Sniper's Mark
-
Sniper's Mark is a curse that causes enemies to take up to 40% increased
projectile damage.
- You can use it on bosses.
Flame Dash
- Flame Dash is a great movement skill.
Jewels
Look for these mods on rare jewels:
- Minion Damage
- Maximum Life
- Cast Speed
- Dexterity
Abyss Jewel
Mods
- It will
increase minion damage if you use a minion skill.
- Minions deal
additional lighting damage.
Notes
- These jewels are awesome
because you trigger the extra damage when using the skill predator.
Important Nodes
- Renewal: This
cluster jewel grants a good amount of damage.
- Blessed Rebirth: This
cluster jewel won't let your skeletons take damage for 4 seconds after being
summoned.
Skill Tree
Pantheon
Major
God: Lunaris
Minor
God: Garukhan
Bandits
Leveling
This build has a super
easy leveling process, and it is beginner-friendly. The following leveling
instructions are made to make your Life easier during your progress. But if
this is your first character, you probably won't have access to all those
leveling PoE Items right away. If that's
your case, don't worry, you'll be totally fine even without them.
Tips
- You can use Fireball
until you are on level 4.
- Get your Summon Raging
Spirits when you reach lvl 4 and use the recommended leveling items until reaching
lvl 49 when you are going to start using Mage Skeletons.
Leveling setup of links:
- The first skill you'll
get is Fireball. Use it until level 4.
- As soon as you reach the
first town, get Raise Zombies as your quest reward.
- Reaching level 4,
replace Fireball with Summon Raging Spirits.
- Reaching level 8,
support Summon Raging Spirits with Added Fire Damage, Minion Damage, and Melee
Splash.
- Also, on level 8, support
your Raise Zombies with Minion Damage.
- Reaching level 10, you
can use a Skeleton Totem for extra boss damage.
- Also, on level 10,
activate Clarity for more mana regeneration.
- Reaching level 16,
activate Summon Skitterbots for more damage and survivability.
- Reaching level 18,
replace Added Fire Damage with Melee Physical Damage on your Summon Raging
Spirits setup. This will be your main setup until level 49.
- Also, on level 18,
support your Zombies with minion life and melee physical damage.
- When you reach level 18,
if you have Dead Reckoning, support it with Controlled Destruction. Or, if you
don't have DR yet, use Melee Physical Damage.
- Reaching level 49, you
should buy a Sire of Shards and start using Mage Skeletons on your main skill.
Support your Mage Skeletons with Minion Damage, Pierce, and Spell Echo.
- Also, on level 49,
replace Clarity with Zealotry.
- Reaching level 59, you
can equip your Femurs of the Saints and start using the main skeleton setup.
Support your Mage Skeleton with Greater Multiple Projectiles, Pierce, and Spell
Echo. Use Minion Damage if you have a 5L and use Predator if you have a 6L.